Before delving into setting up the SMTP integration, it is important to think about the following questions:
1. Advanced Networking Requirements : Is client SMTP public/internet or private/intranet?
If its public, then flexible egress needs to be enabled on AEMaaCS. If its private, then dedicated egress needs to be enabled and the dedicated IP would need to be whitelisted.
2. Which port?
By default, only https on port 80/443 is enabled on cloud. So, SMTP on port 587/465 needs to be enabled through port forward proxy. The proxy hosts would need to be configured in DAY CQ mail service.
More details on advanced networking and port forwards wrt AEM email service can be found here.
3. Authentication: Basic or OAUTH?
AEM DAY CQ mail service supports both Basic and OAuth2 authentication. Basic authentication is easy to achieve but might not fulfil modern security requirements. OAuth on the other hand is much more secure and is now the de facto industry standard for online authentication.
OAUTH2 support is available in AEM for multiple email providers like Outlook, gmail etc. Here we will be mainly focusing on Microsoft Office 365 Outlook.
How to Setup
Setup is a two step process
- Setup SMTP on Azure to use OAuth for outlook. Once setup is done gather the information required for setup on the AEM side.
- Setup the integration on AEM using Oauth Provider and Day CQ mail service configurations.
Azure SMTP Setup for Outlook
1. Set up Azure account to use SMTP OAuth2
This is where we give permissions to your SMTP app on azure to send emails
a) Open Microsoft Azure and log in.
b) Search “Azure Active Directory” in the search bar or click here.
c) Select App Registration and then click on new registration.
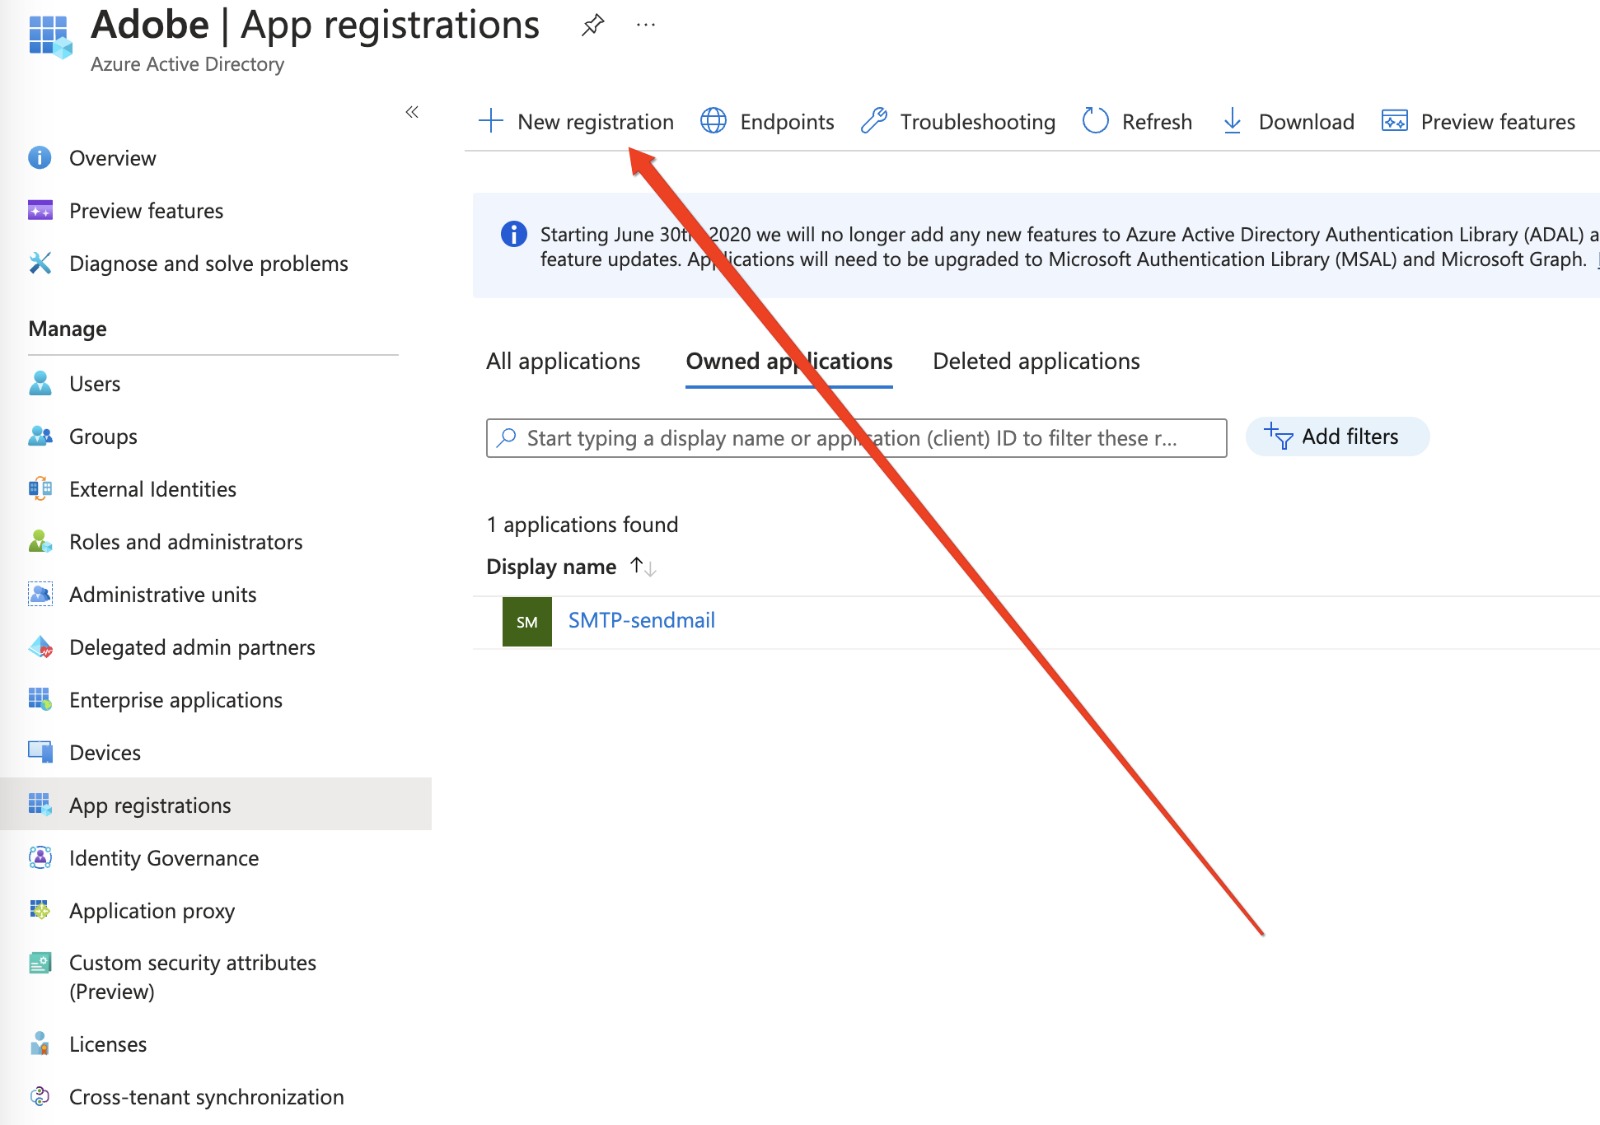
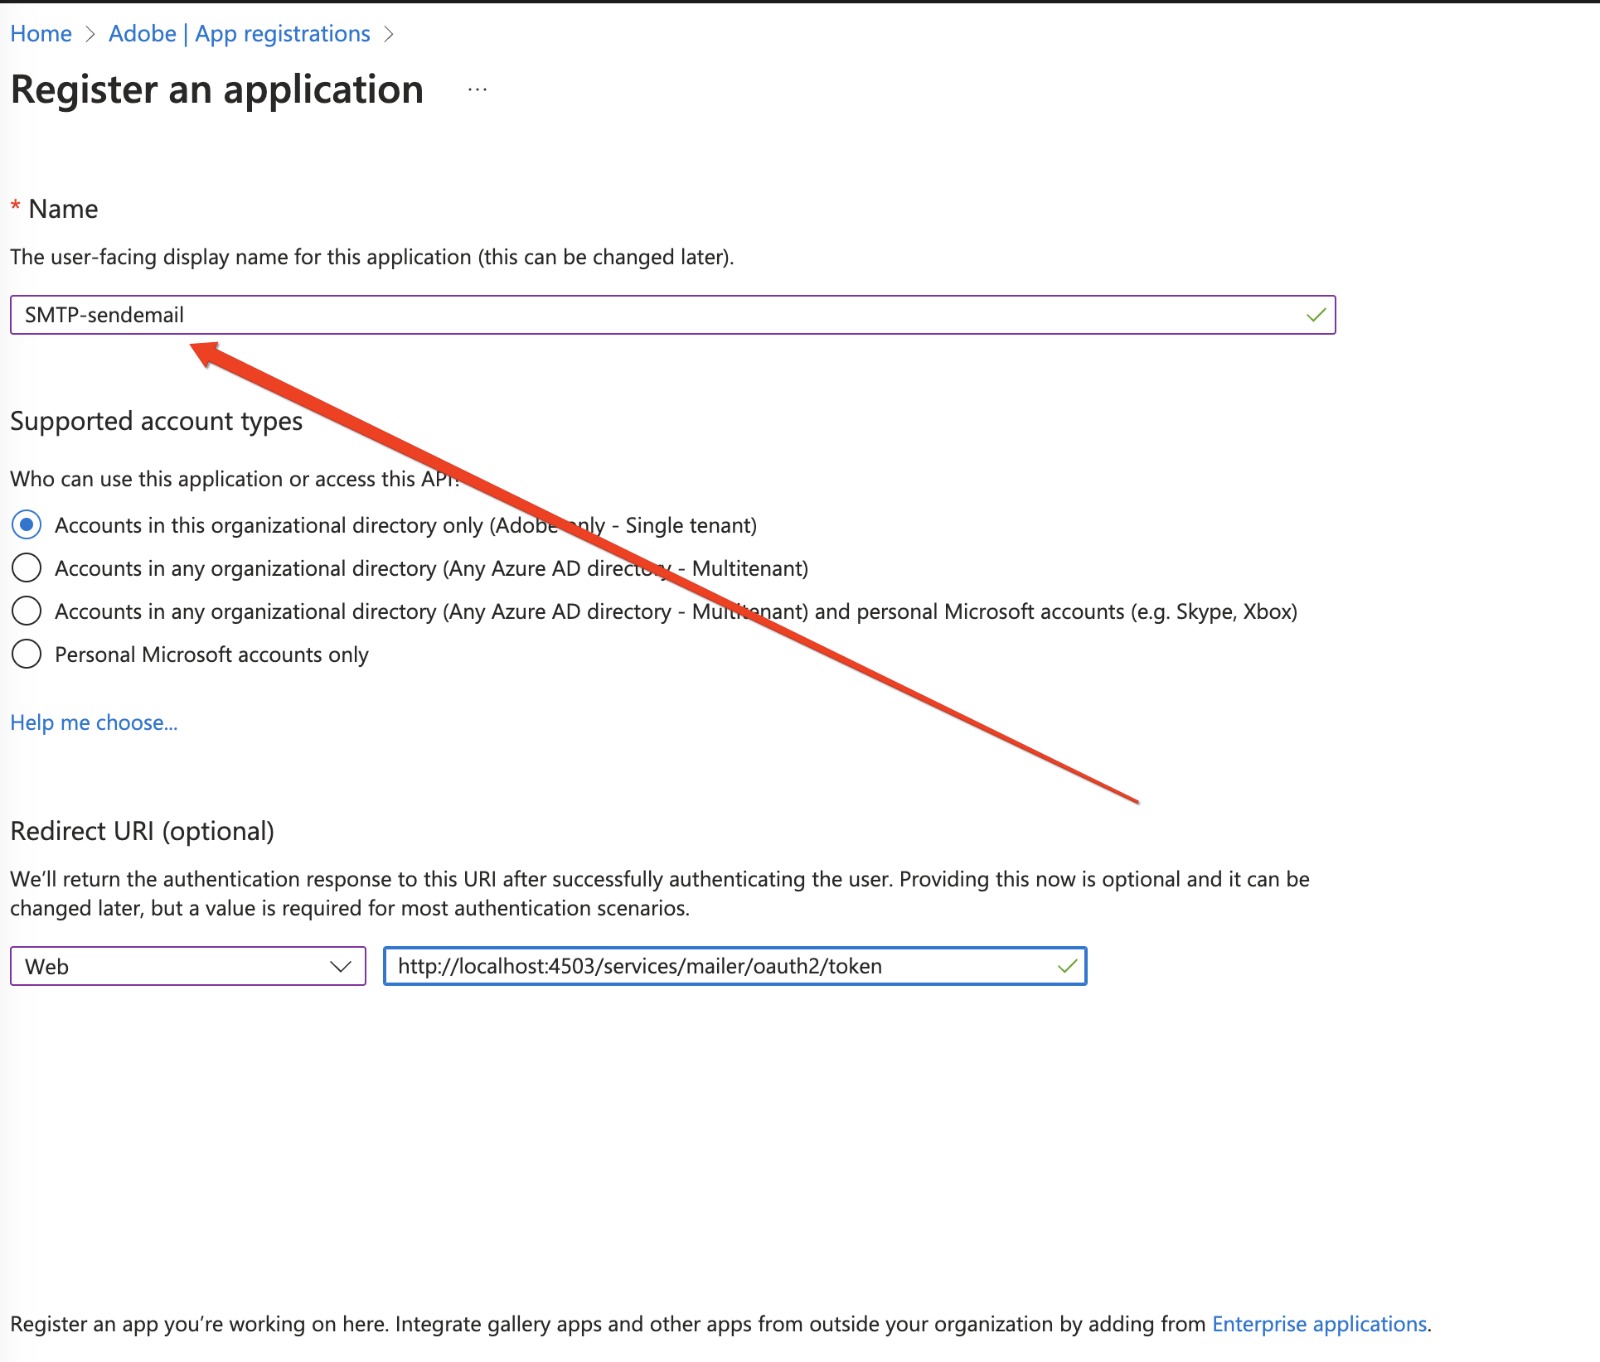
d) Fill all the required information and click on register.
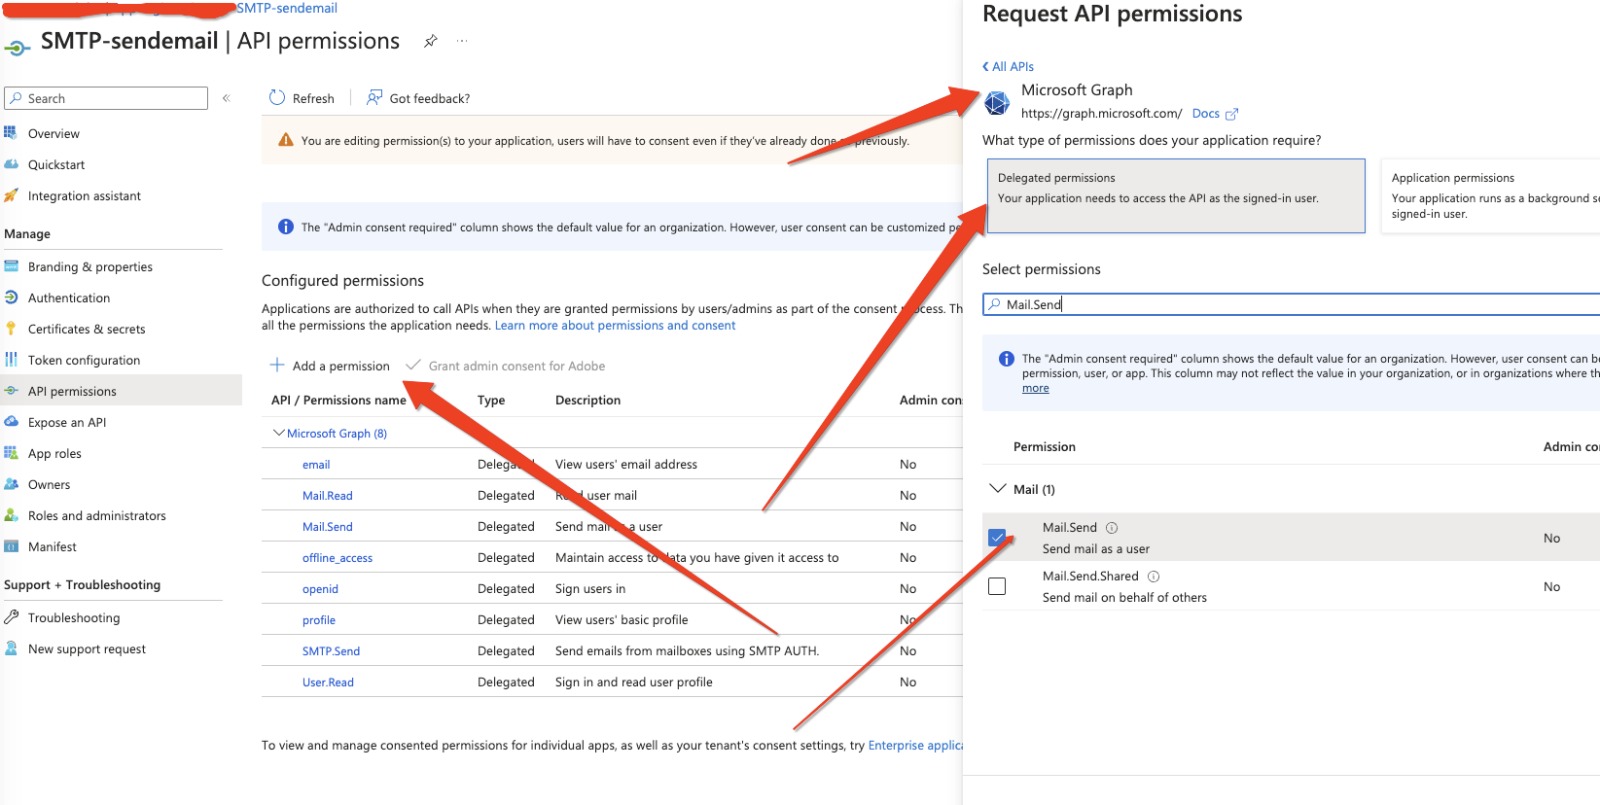
e) Now go to your newly created app and select API Permissions.
Then Add permission → Select Microsoft graph API → delegated permissions, and then add below permissions for your app
https://graph.microsoft.com/SMTP.Send
https://graph.microsoft.com/Mail.Read
https://graph.microsoft.com/Mail.Send
https://graph.microsoft.com/User.Read
openid
offline_access
email
profile
https://outlook.office365.com/SMTP.Send
f) Now go to Authentication and add the below Redirect Urls.
http://localhost/
http://localhost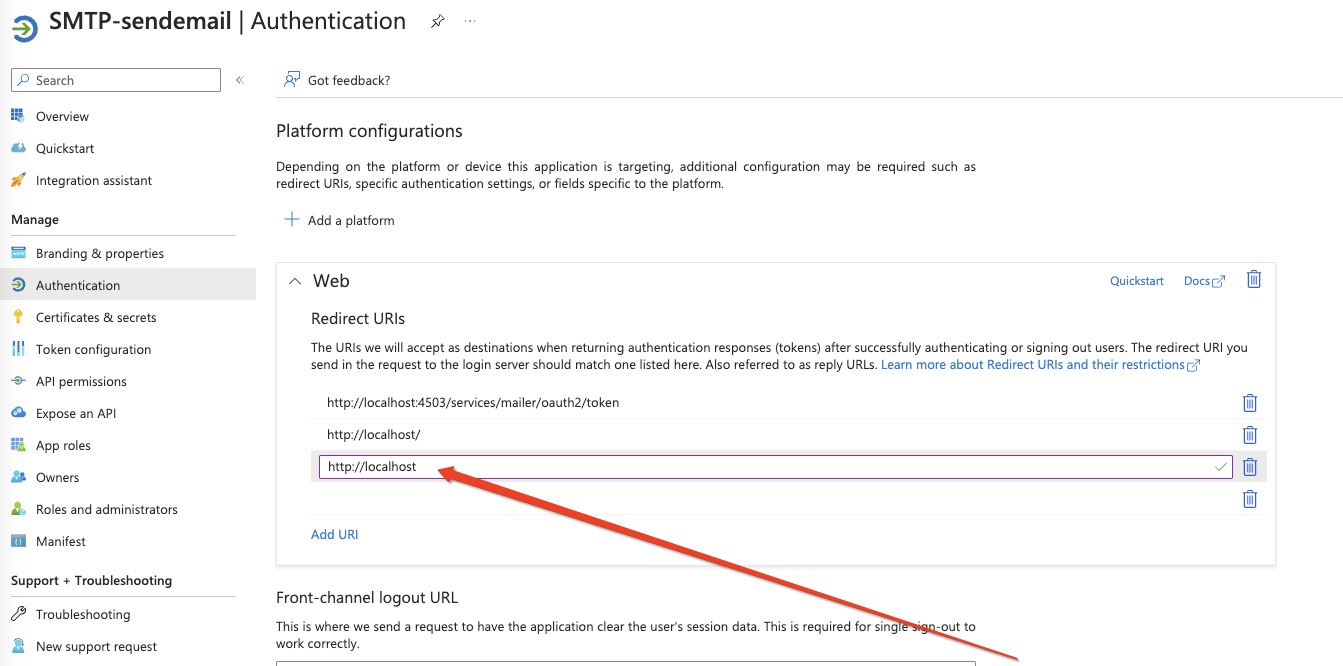
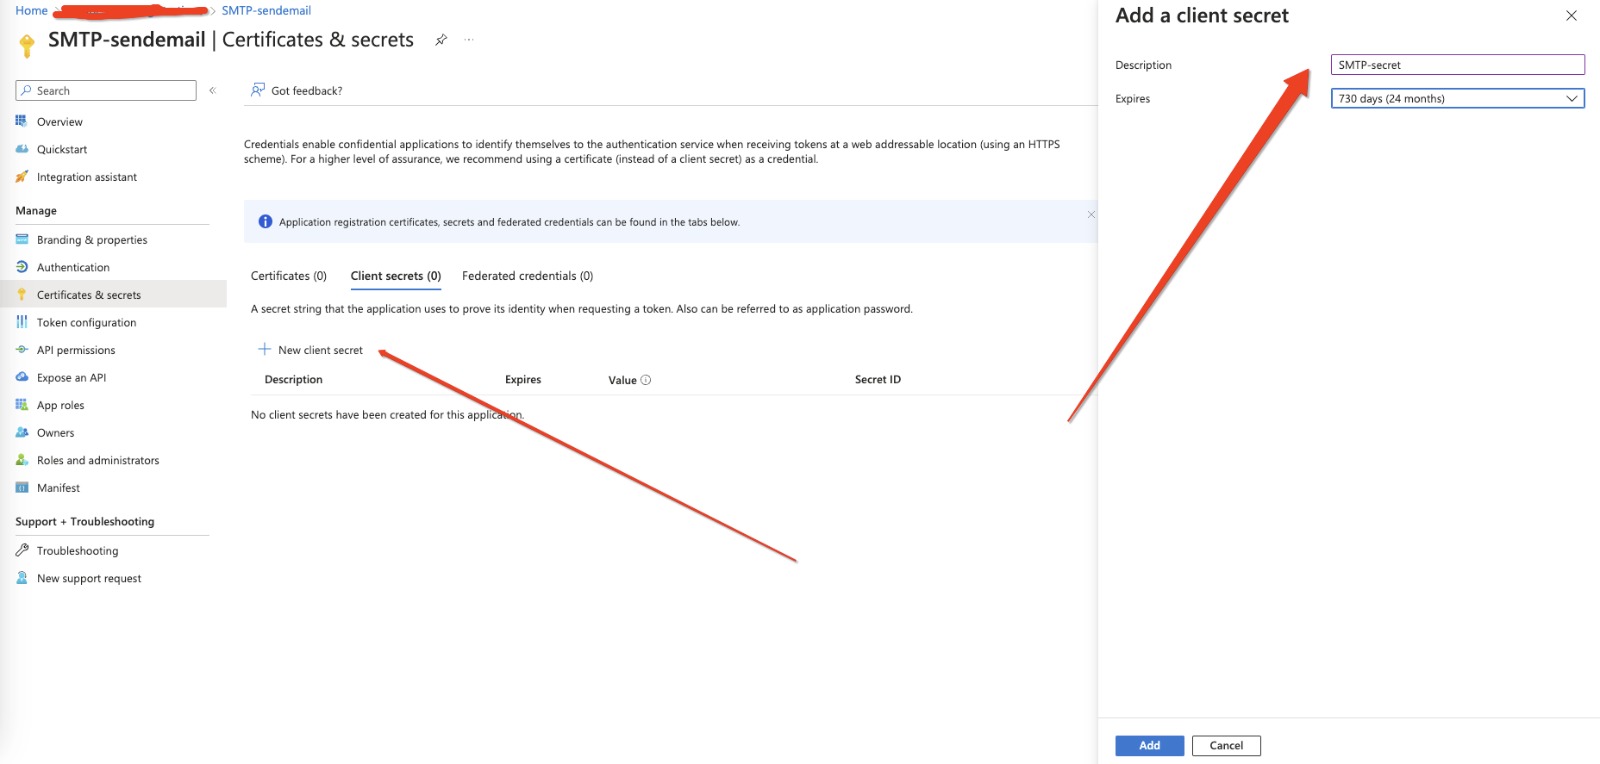
g) Go to “Certificates and secrets” → “new client secret” and then Add a client Secret.
h) Goto Overview and make a note of the clientID and Tenet id values.
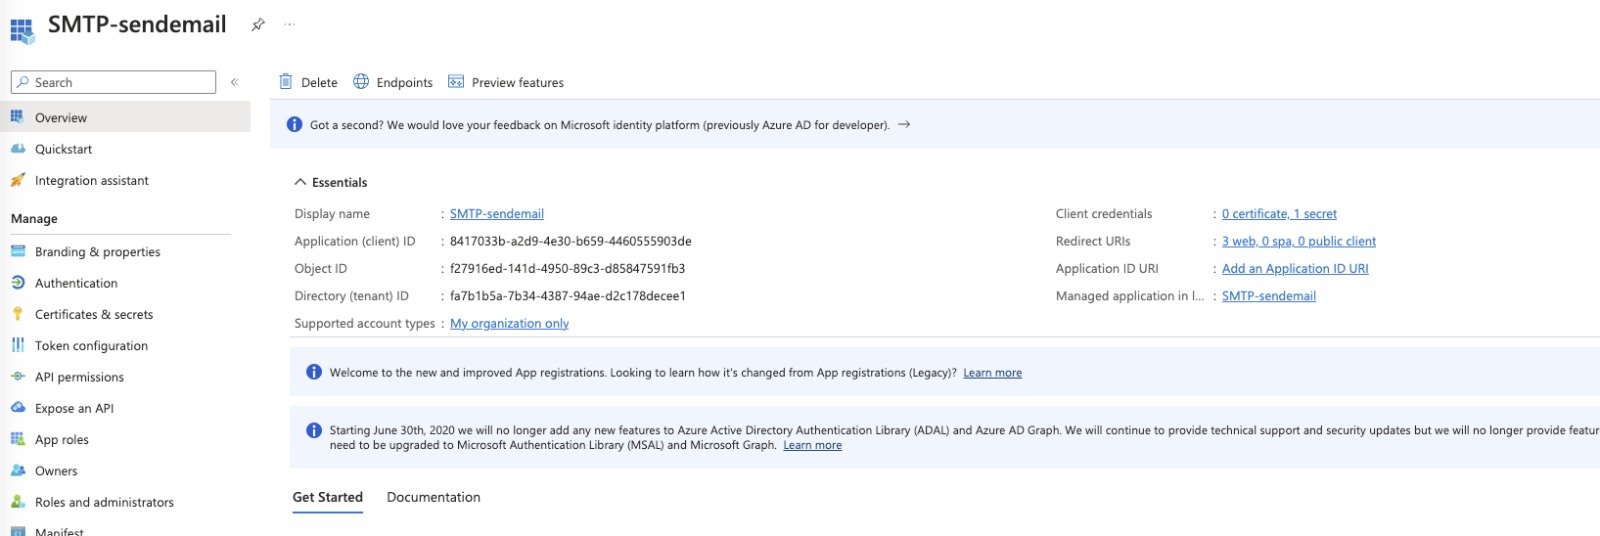
i) Now you should have the following information with you.
- AuthURL: https://login.microsoftonline.com/<tenetID>/oauth2/v2.0/authorize
- TokenURL : https://login.microsoftonline.com/<tenetID>/oauth2/v2.0/token
- RefreshURL: https://login.microsoftonline.com/<tenetID>/oauth2/v2.0/token
- clientID : <clientID>
- clientSecret : <clientSecret>
2. Generating access token
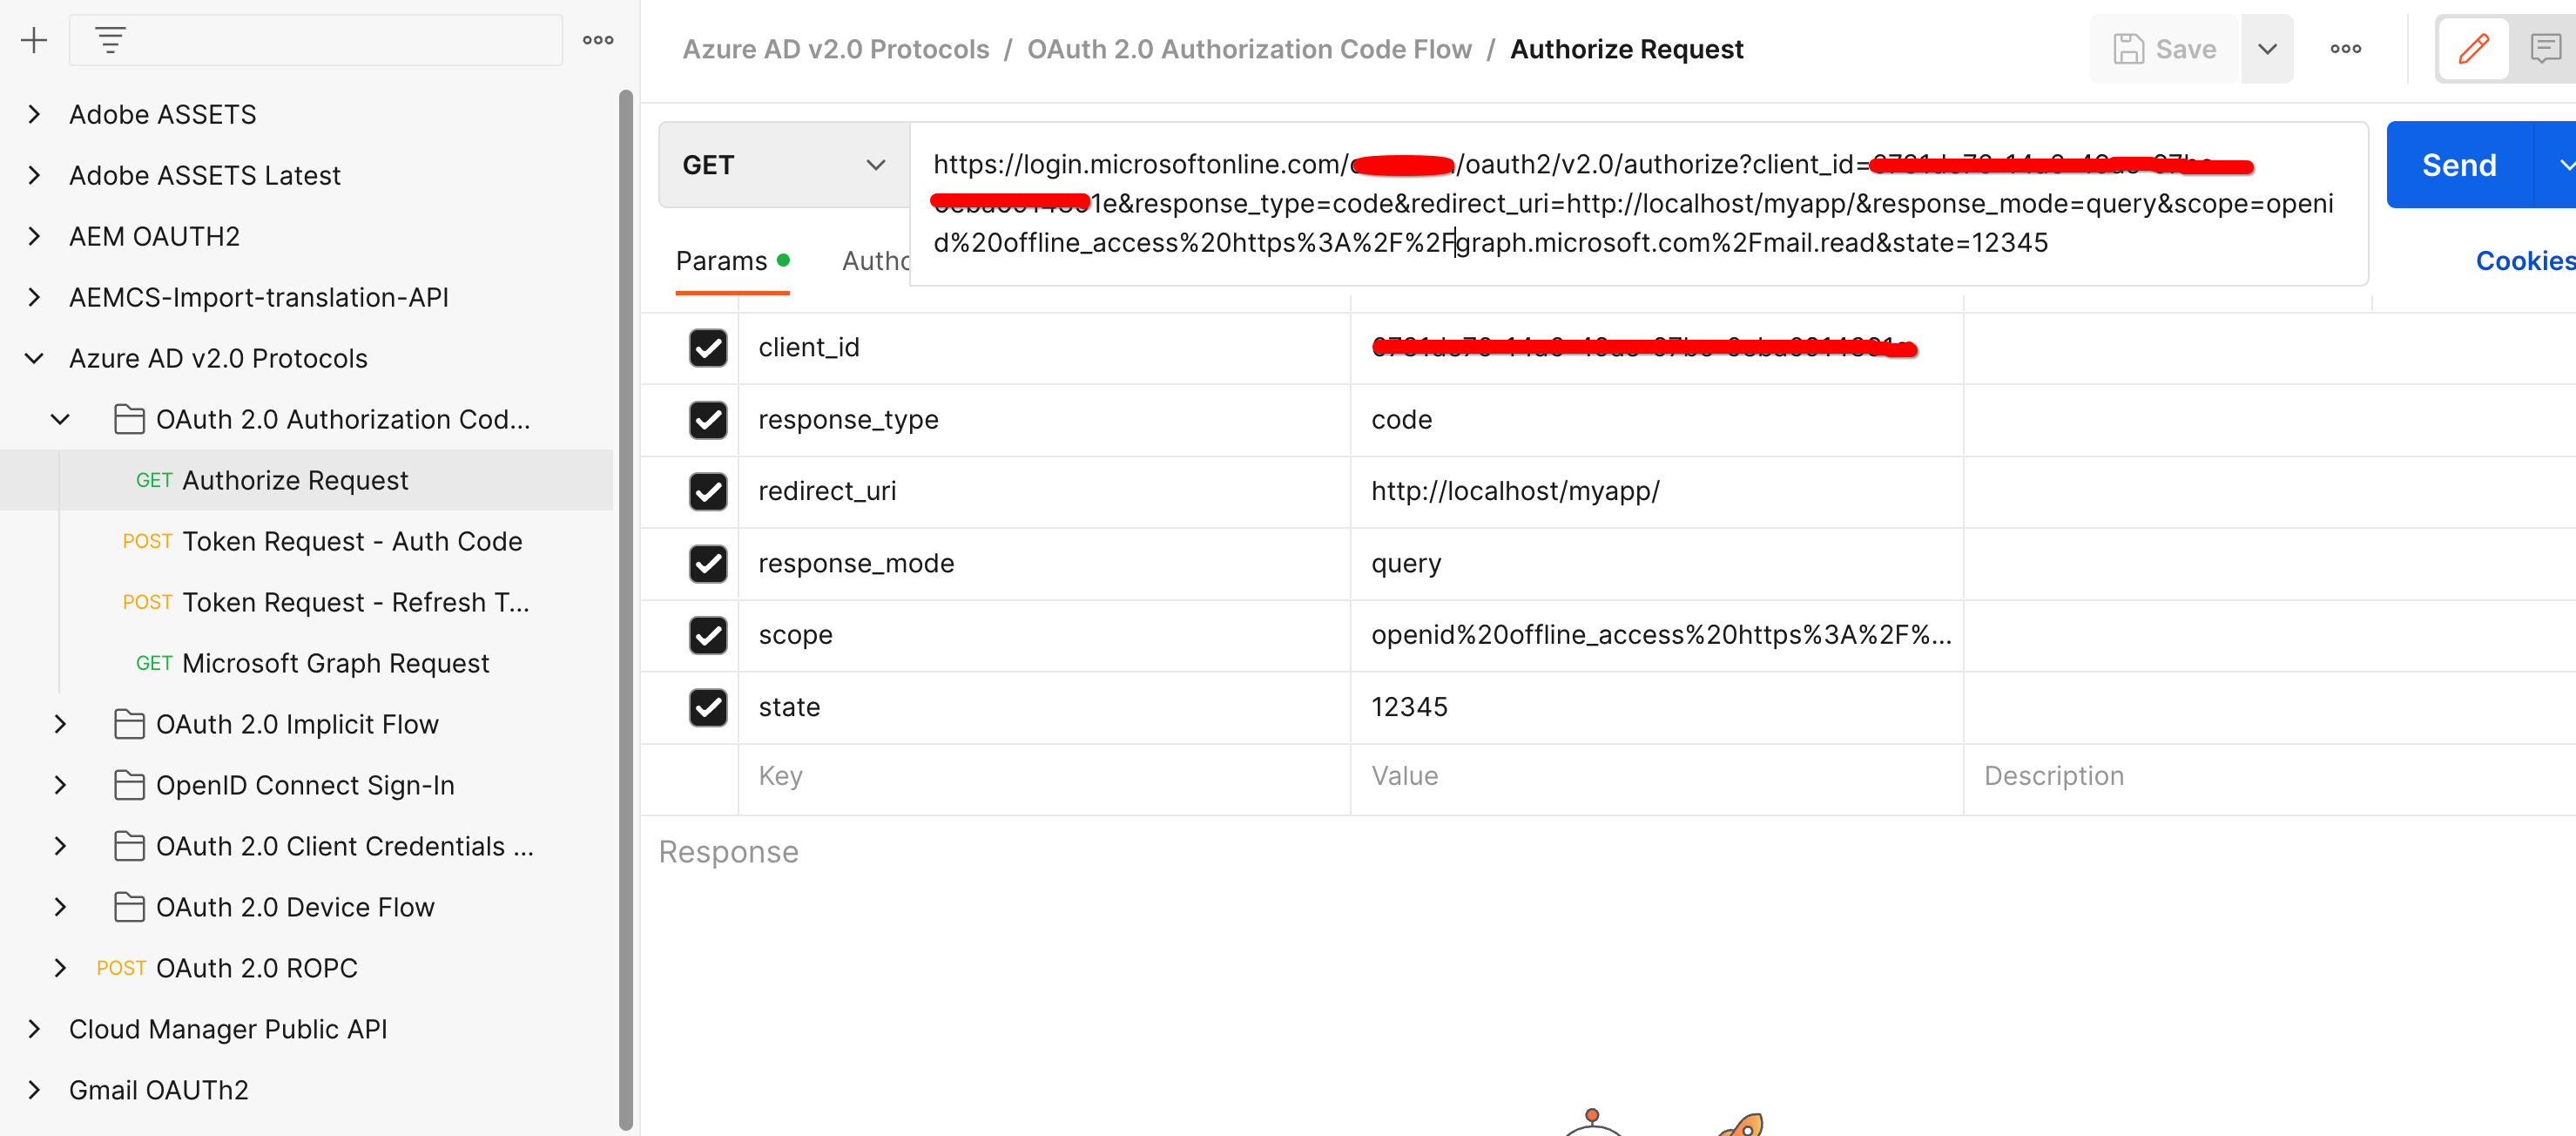
a) Generate auth code using offline access scope. Auth code generated with offline access can be used for generating refresh token. You will be asked to give permissions.
Copy the below URL in the browser replacing the ClientID and TenanID values.
https://login.microsoftonline.com/<tenantID>/oauth2/v2.0/authorize?
client_id=<clientId>&
response_type=code&
redirect_uri=http://localhost&
response_mode=query&
scope=https://graph.microsoft.com/SMTP.Send https://graph.microsoft.com/Mail.Read https://graph.microsoft.com/Mail.Send https://graph.microsoft.com/User.Read email openid profile offline_access&
state=12345
OR via Postman
You can get the Postman API collection from here.
b) You will be redirected to something like
http://localhost/?code=<code>&state=12345&session_state=4f984c6b-cc1f-47b9-81b2-66522ea83f81#
Copy the value of <code> from the url.
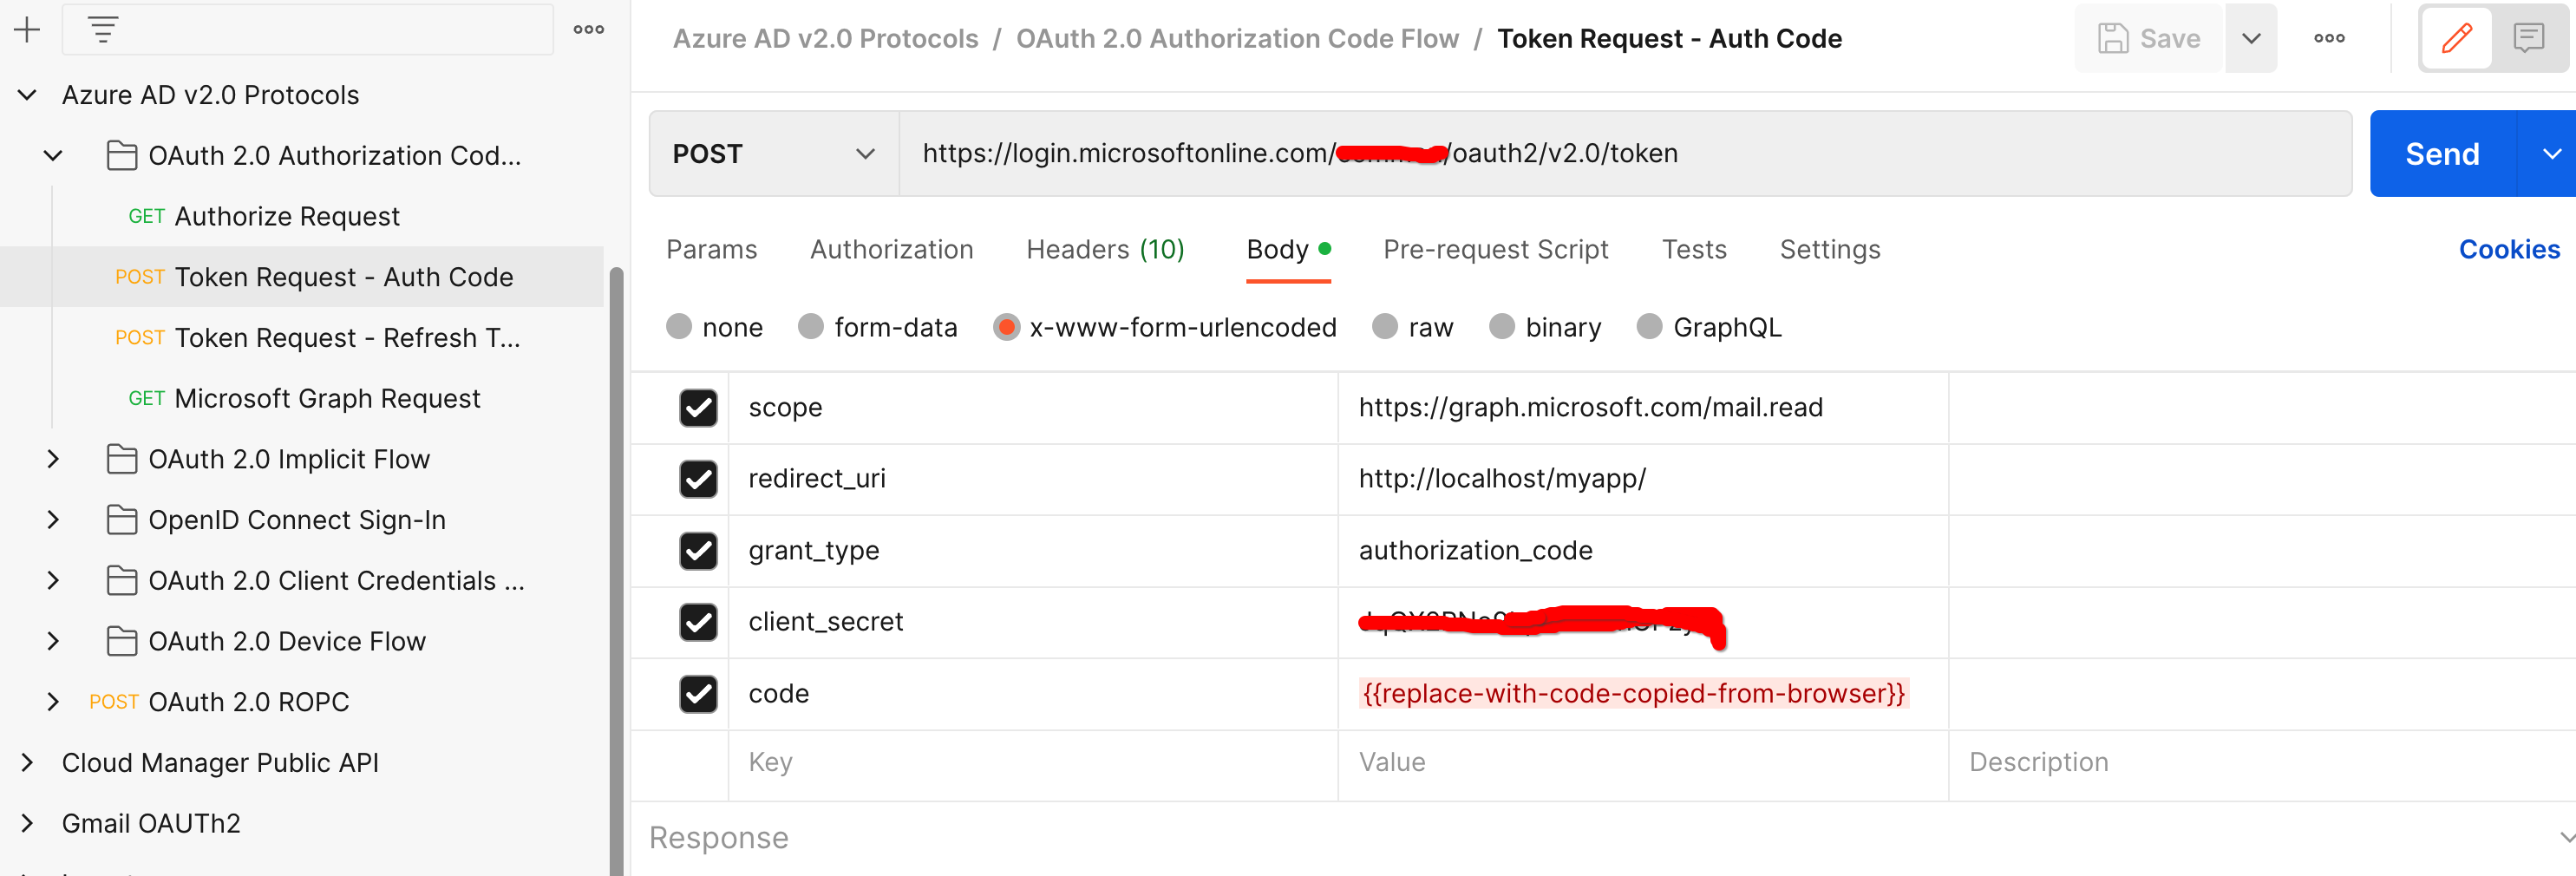
c) Generate refresh and access token
Replace tenetID, clientID, clientSecret and code with your values and then use the below given CURL to get access token. This cmd will give both access token and refresh token.
curl --location --request POST 'https://login.microsoftonline.com/<tenantId>/oauth2/v2.0/token' \
--header 'Content-Type: application/x-www-form-urlencoded' \
--header 'Cookie: buid=0.ARgAep0nU49DzUGmoP2wnvyIkcQjsx26HEpOnvHS0akqXQgYAAA.AQABAAEAAAD--DLA3VO7QrddgJg7Wevry9XPJSKbGVlPt5NWYxLtTl3K1W0LwHXelrffApUo_K02kFrkvmGm94rfBT94t25Zq4bCd5IM3yFOjWb3V22yDM7-rl112sLzbBQBRCL3QAAgAA; esctx=AQABAAAAAAD--DLA3VO7QrddgJg7Wevr4a8wBjYcNbBXRievdTOd15caaeAsQdXeBAQA3tjVQaxmrOXFGkKaE7HBzsJrzA-ci4RRpor-opoo5gpGLh3pj_iMZuqegQPEb1V5sUVQV8_DUEbBv5YFV2eczS5EAhLBAwAd1mHx6jYOL8LwZNDFvd2-MhVXwPd6iKPigSuBxMogAA; x-ms-gateway-slice=estsfd; stsservicecookie=estsfd; fpc=Auv6lTuyAP1FuOOCfj9w0U_5vR5dAQAAALDXP9gOAAAAwIpkkQEAAACT2T_YDgAAAA' \
--data-urlencode 'client_id=<clientID>' \
--data-urlencode 'scope=https://graph.microsoft.com/SMTP.Send https://graph.microsoft.com/Mail.Read https://graph.microsoft.com/Mail.Send https://graph.microsoft.com/User.Read email openid profile offline_access https://outlook.office365.com/SMTP.Send' \
--data-urlencode 'redirect_uri=http://localhost' \
--data-urlencode 'grant_type=authorization_code' \
--data-urlencode 'client_secret=<clientSecret>' \
--data-urlencode 'code=<code>'
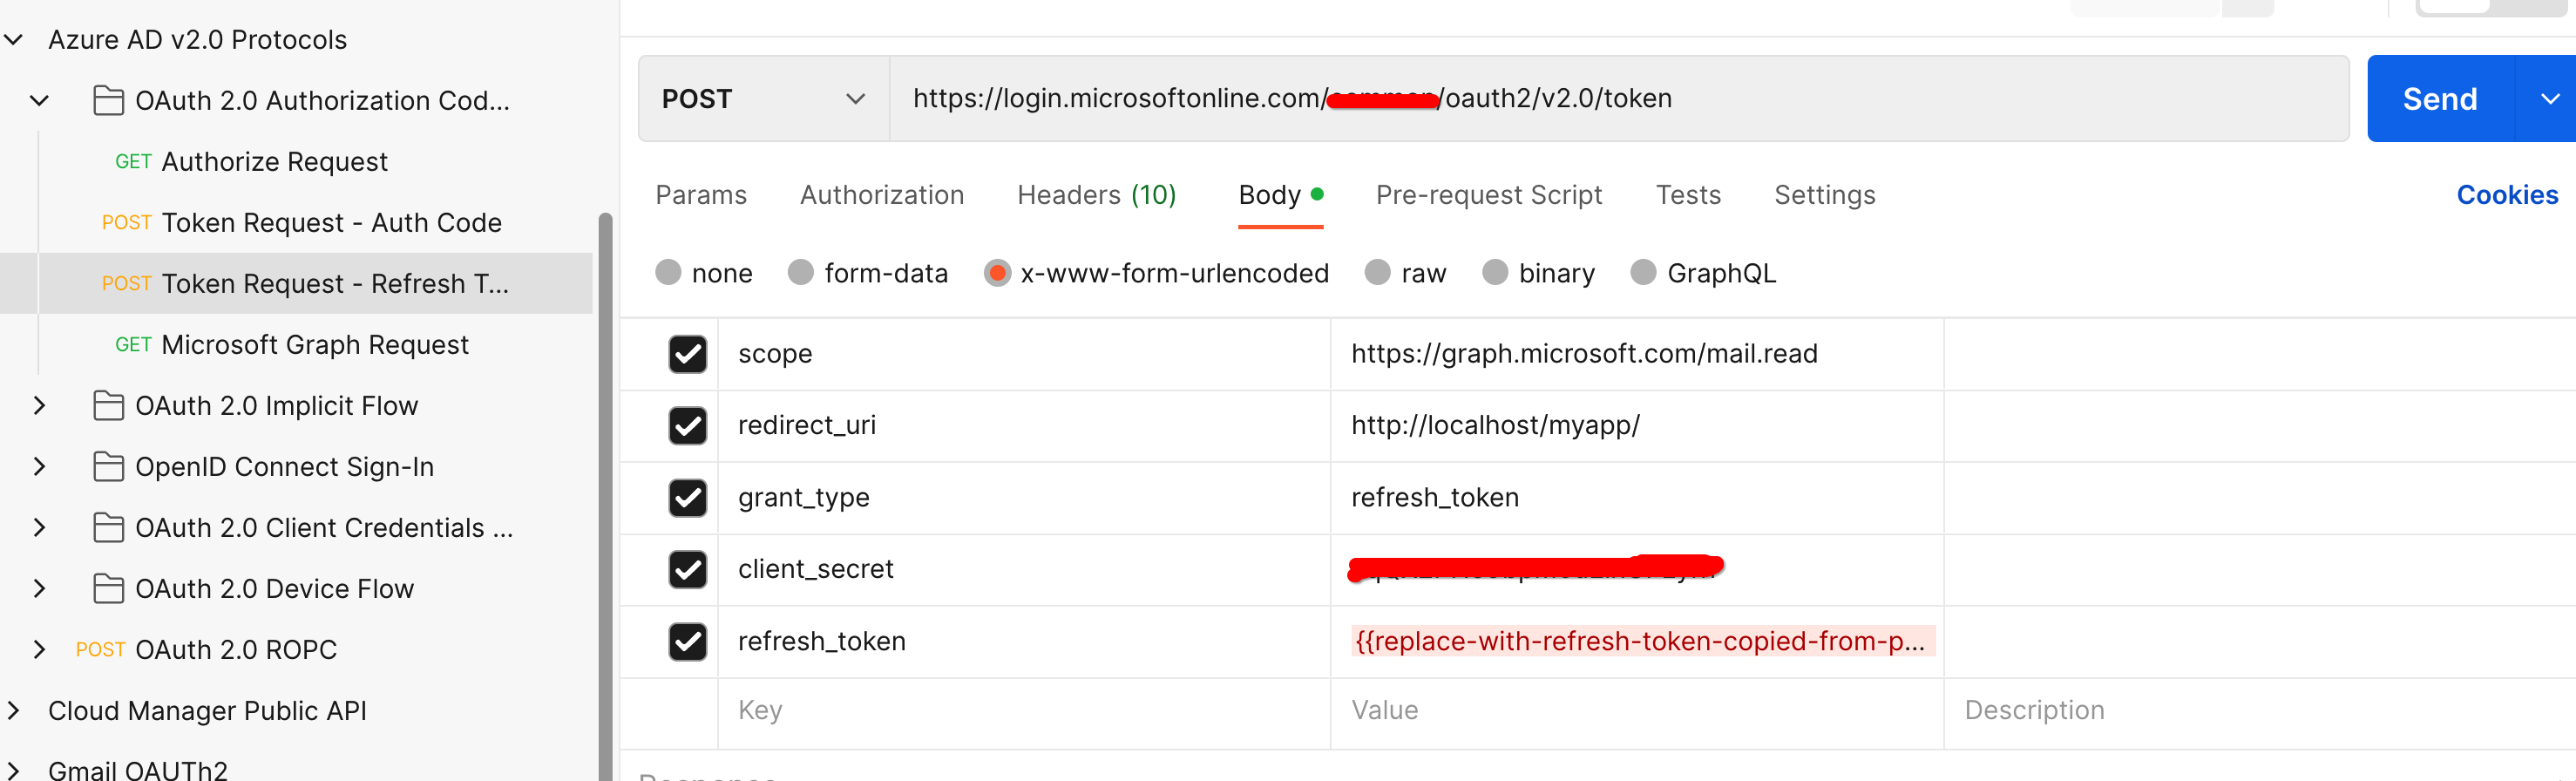
Via postman
d) Make a note of the access token and refresh token.
Access token can now be generated from refresh token.
curl --location --request POST 'https://login.microsoftonline.com/<tenetId>/oauth2/v2.0/token' \
--header 'Content-Type: application/x-www-form-urlencoded' \
--header 'Cookie: buid=0.ARgAep0nU49DzUGmoP2wnvyIkcQjsx26HEpOnvHS0akqXQgYAAA.AQABAAEAAAD--DLA3VO7QrddgJg7Wevry9XPJSKbGVlPt5NWYxLtTl3K1W0LwHXelrffApUo_K02kFrkvmGm94rfBT94t25Zq4bCd5IM3yFOjWb3V22yDM7-rl112sLzbBQBRCL3QAAgAA; esctx=AQABAAAAAAD--DLA3VO7QrddgJg7Wevr4a8wBjYcNbBXRievdTOd15caaeAsQdXeBAQA3tjVQaxmrOXFGkKaE7HBzsJrzA-ci4RRpor-opoo5gpGLh3pj_iMZuqegQPEb1V5sUVQV8_DUEbBv5YFV2eczS5EAhLBAwAd1mHx6jYOL8LwZNDFvd2-MhVXwPd6iKPigSuBxMogAA; x-ms-gateway-slice=estsfd; stsservicecookie=estsfd; fpc=Auv6lTuyAP1FuOOCfj9w0U_IezHLAQAAAPeNSdgOAAAA' \
--data-urlencode 'client_id=<client_id>' \
--data-urlencode 'scope=https://graph.microsoft.com/SMTP.Send https://graph.microsoft.com/Mail.Read https://graph.microsoft.com/Mail.Send https://graph.microsoft.com/User.Read email openid profile offline_access https://outlook.office365.com/SMTP.Send' \
--data-urlencode 'redirect_uri=http://localhost' \
--data-urlencode 'grant_type=refresh_token' \
--data-urlencode 'client_secret=<client_secret>' \
--data-urlencode 'refresh_token=<refreshToken>'
e) Send a mail using the accessToken, to see if is working properly. Get messages using access token.
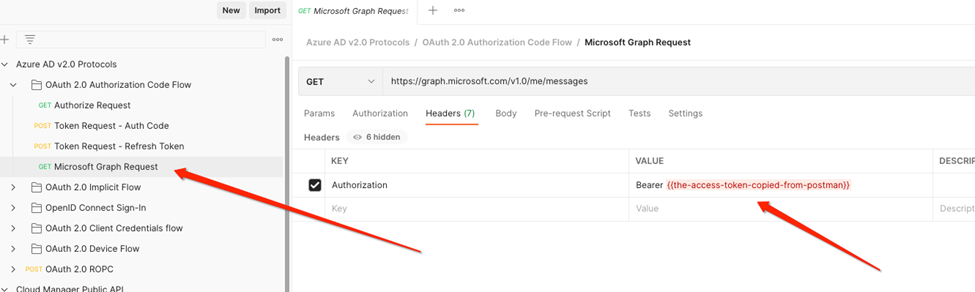
f) Make note of the refreshToken and accessToken for aem integration.
Integration with AEM as a Cloud Service for OAuth2
1. Configure SMTP Oauth2 config with all the necessary values gathered in the previous steps.
com.day.cq.mailer.oauth.impl.OAuthConfigurationProviderImpl.cfg.json

2. Configure refreshToken values and clientSecret values using the Cloud Manager API as described here.

3. Advanced Networking for AEMaaCS: Depending on your requirement flexible or dedicated egress need to be setup for the AEMaaCS environment. Once enabled, port forwards need to be setup for your proxy host using Cloud Manager API.
Port forwards would look something like this once setup.
{
    "nonProxyHosts": [
        "*.example.com",
        "*.example.net"
    ],
    "portForwards": [
        {
            "name": "smtp.example.com",
            "portDest": 587,
            "portOrig": 30587
        }
    ]
}
4. Configure com.day.cq.mailer.impl.DefaultMailService.cfg.json OSGI service to use the external mail service using cloud manager port forwards setup in the previous step.
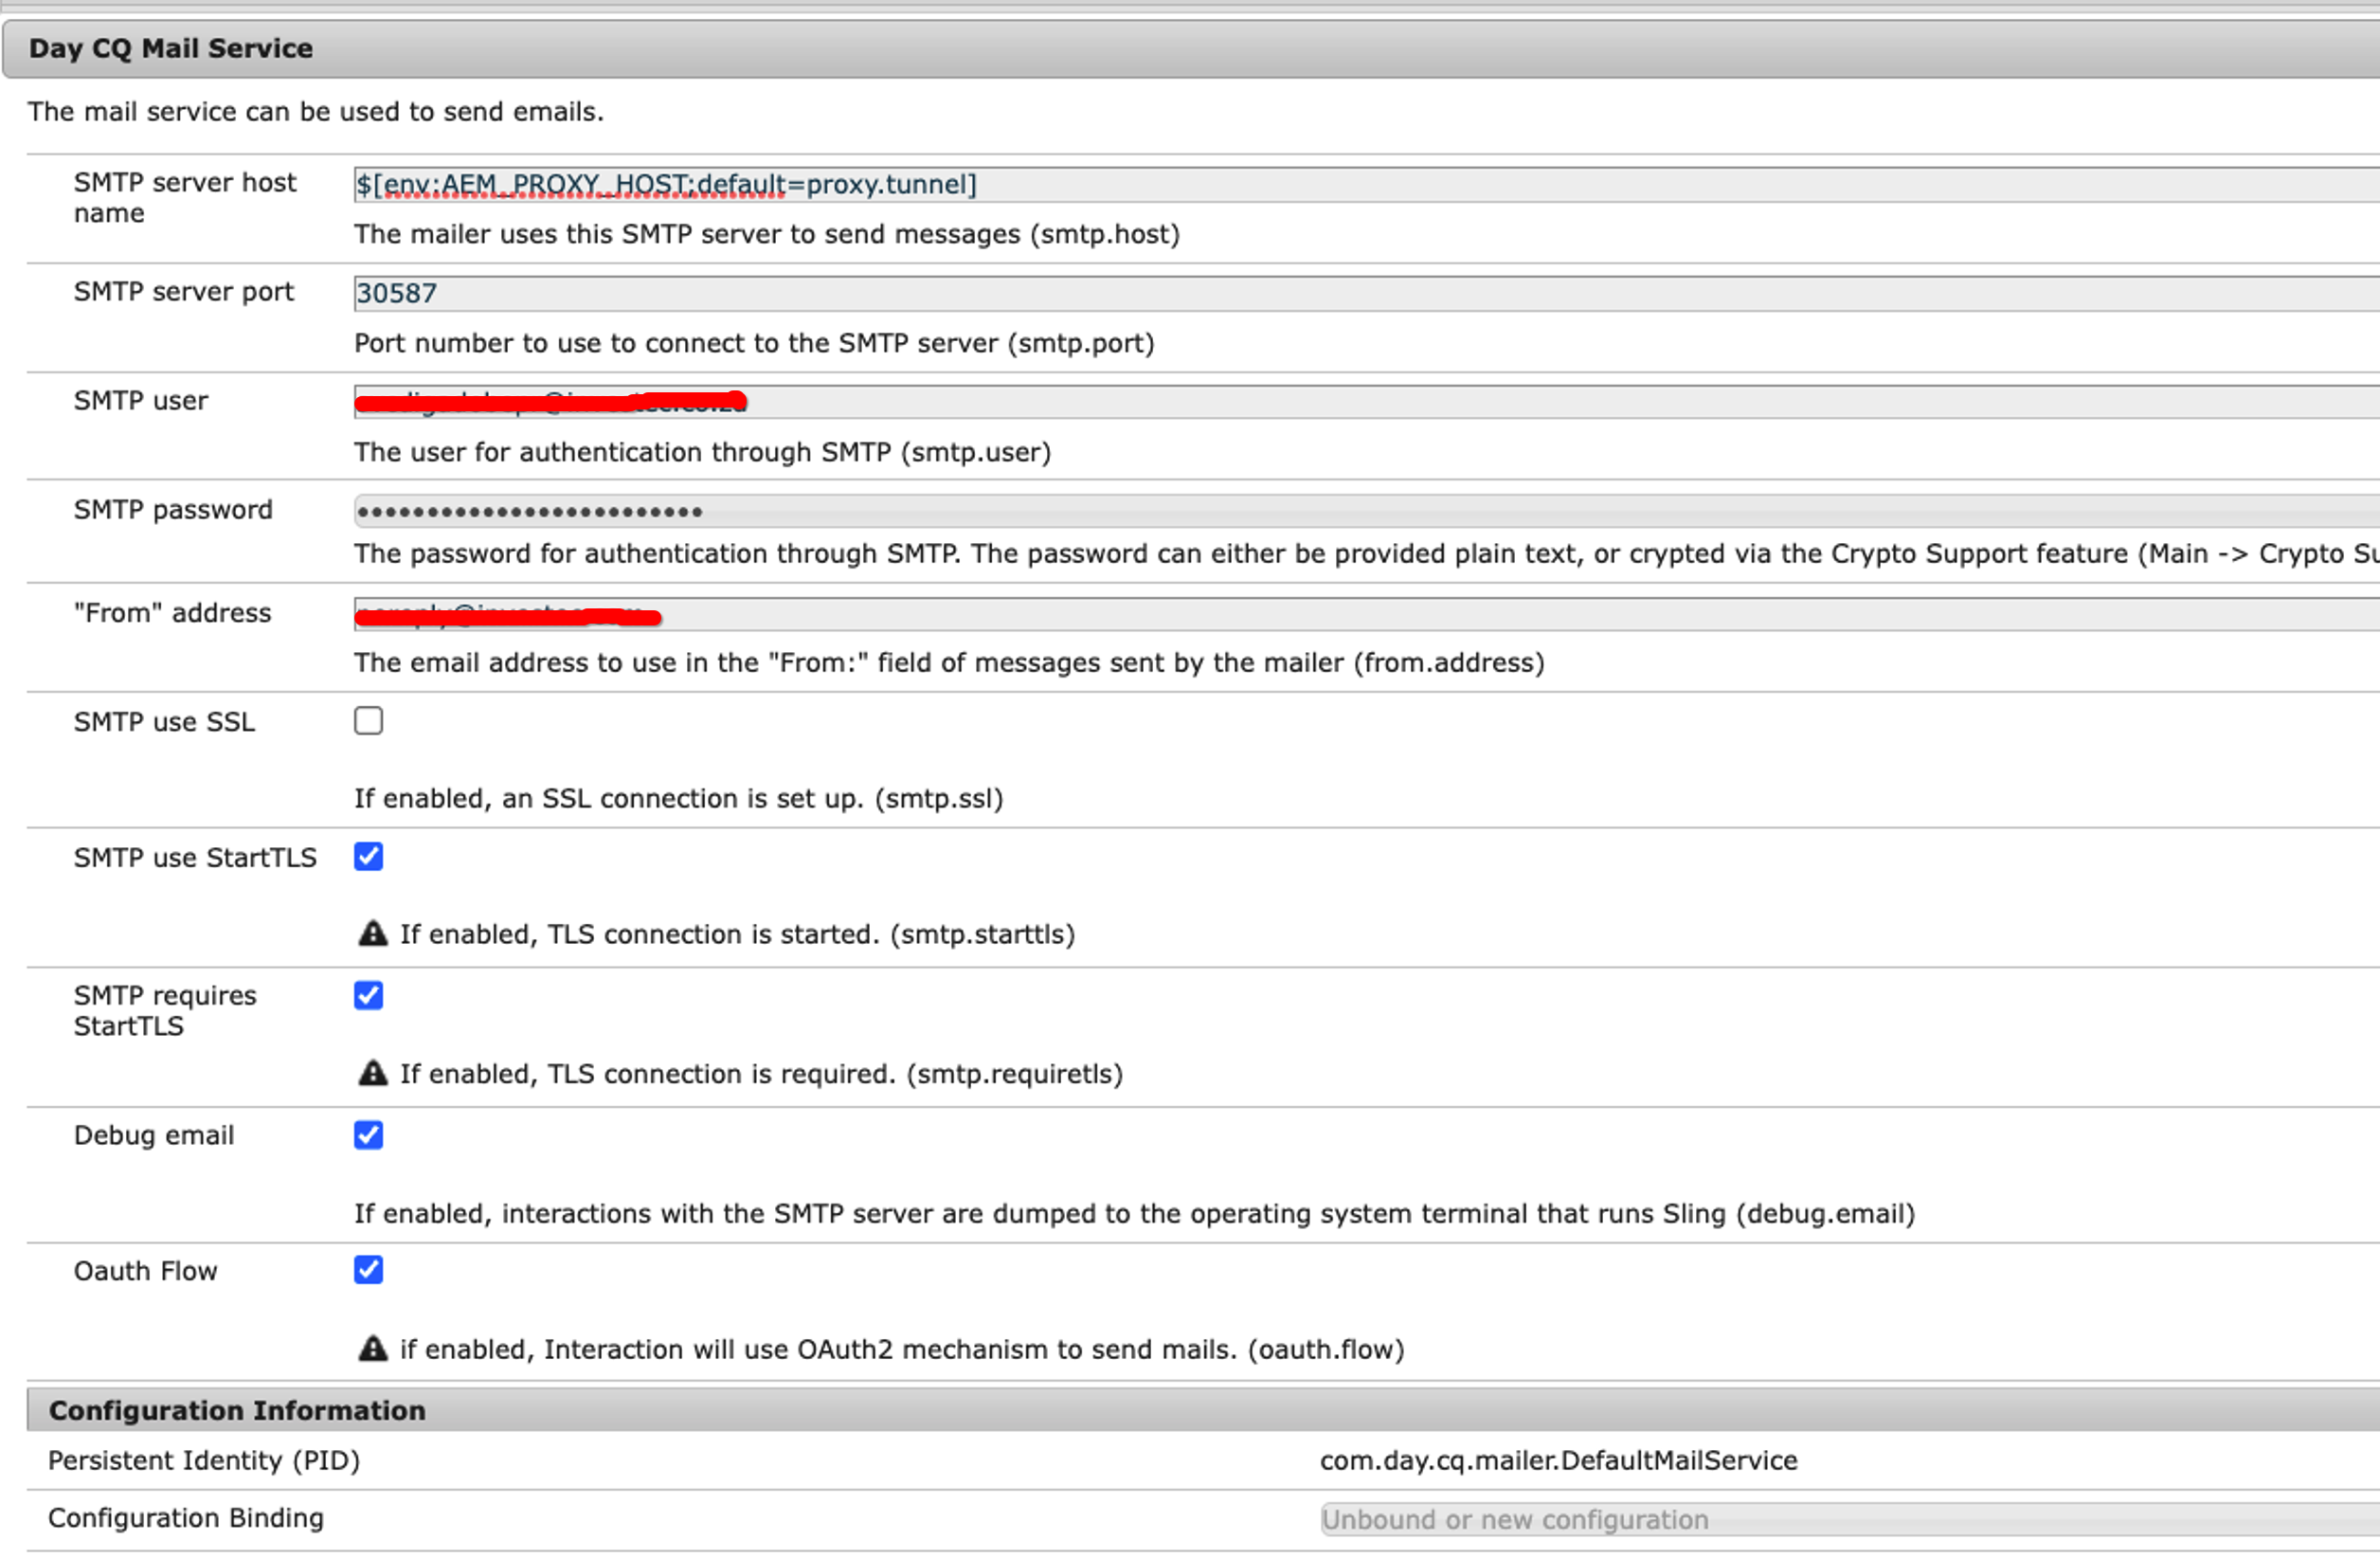
Ensure that the following properties are correctly configured in the OSGi configuration:
- The
smtp.hostis set to the OSGi environment variable $[env:AEM_PROXY_HOST;default=proxy.tunnel].
This configuration ensures that the SMTP communication is routed through the egress, allowing for proper connectivity.
If the environment variableAEM_PROXY_HOSTis not set, the default value ofproxy.tunnelwill be used for thesmtp.hostconfiguration. - The
smtp.portconfiguration is set to theportForward.portOrigport, which corresponds to the host and port of the destination email service. In the provided example, the mapping used isAEM_PROXY_HOST:30587tosmtp.example.com:587. - smtp.password is not required for oauth.can be left empty.
- smtp.user – use env variable to set smtp.user “$[env: SMTP_USER]”,
- smtp.starttls : for port 587 make sure to set smtp.starttls=true
You should be good to go now and send emails from AEM to Microsoft Outlook over OAuth2.
Troubleshooting
Issue:
com.day.cq.mailer.oauth.impl.OAuthCodeServiceImpl error occurred while fetching accessToken using RefreshToken
org.apache.oltu.oauth2.common.exception.OAuthProblemException: invalid_client, AADSTS500116: The reply uri specified in the request is not a valid URL. Allowed schemes: ‘*’.
Resolution:
To resolve this error, you need to add the following key-value pair to the OSGi configuration file com.day.cq.mailer.oauth.impl.OAuthConfigurationProviderImpl.cfg.json:
“authCodeRedirectUrl”: “http://localhost“
Issue:
com.sun.mail.util.MailConnectException: Couldn’t connect to host, port: azure-com.mail.outlook.com, 587; timeout 60000
Resolution:
AEM is attempting to establish a connection with the remote server, but it should actually be connecting to proxy.tunnel:30587.
The Host and port are set to the remote SMTP server instead they should be set to the proxy host and port.
Instead of observing AEM trying to connect to azure-com.mail.protection.outlook.com:587, you should see it attempting to connect to proxy.tunnel:30587 in the logs.
Issue:
Sending the email to the following server failed :
email-smtp.us-east-1.amazonaws.com:30587
at com.day.cq.mailer.impl.DefaultMailService.send(DefaultMailService.java:322) [com.day.cq.cq-mailer:5.2.22]
Resolution:
The host is not configured correctly. Ensure that smtp.host is set to the OSGi environment variable $[env:AEM_PROXY_HOST;default=proxy.tunnel] so that it can be routed through the egress.
Leave a Reply